Wednesday, December 31, 2014

2 sky gardens at 1 multi storeyed car park

Out of consideration, I won't say where they are, because I am not sure if they are "legalized" community gardens. One is focused on flowers with some vegetables, and the other is almostly entirely made up of vegetable plots. The second one is obviously run by someone who is quite experienced, as the getup (while hideous - seriously yours truly is living in a glasshouse and shouldn't cast stones) is highly efficient, with two crops per lot.
Close up on the portulaca on the right. Please ignore the shadow cast by my FAT arm *lol*
NSFW. Porn! I found it amusing that there were two grasshoppers f**king on the netting above my head.
Anyone know what this is? Some say it is edible. I say it is not.
Efficient gardening. The cucumber plant provides some shade for the caixin from the harsh sun.
I think this is malabar spinach!
weird looking lady's finger
Zinnia
another zinnia

Balsam with red and white petals

Monday, December 29, 2014

The Sorrowful adventure of Daikon

This structure was constructed from a combination of Daiso gardening wire (it came with plastic for cloching) + netting, to discourage thieving birds.

I was reading a Japanese gardening book on how to grow daikon (Japanese white radish) in a pot. Feeling very encouraged by the fotos + since Bobo and I like to eat the root vegetable + I wanted to compete against CU (chinese uncle - see earlier posts- who was growing them in the community garden downstairs), I decided to try it myself. The book advises sowing seeds in circles, then thin the seedlings out in phases so that only five daikon plants remain.

Well. Natural selection and my laziness in watering (I relied on the monsoon season) killed off everyone but two. So I ended up transplanting my tomato plants into the pot instead, devastating Bobo who hates tomatoes.

Monday, December 15, 2014

Sunflower Power @ Community Garden

So much sunflower power at the other community garden. Despite my misgivings towards transplanting sunflower seedlings, the Taiwanese lady had been pretty lucky (ok, she lost a lot of seedlings along the way), but she managed to have at least 2 sunflower plants beaming away. The rest sort of drowned in the monsoon rains.

I haven't much lucky with sunflowers so I consoled myself with taking photos of her big flowers and admired my little roses. *grin*. Maybe I will try sunflowers next year when we reallocate the plots again.

The difference between the two gardens. The older established one has loads of trees, so I can burn a lot of energy cutting branches down and rearranging plants according to MU's direction. It's been pretty awesome, I spend like entire Saturday mornings and afternoons in the garden, only coming up to feed and water Bobo so he wouldn't rouse from his zombie state.

I was given a tiny garden plot, thanks to the irritating Mr L (long story). And since I have planted Kang Kong (to feed snails, it seems, I caught 10! in one afternoon climbing the banana tree), I don't have to maintain it much. But I have demonstrated experience with roses, so my unspoken role is to enhance the beauty of the garden and provide some muscle to the elderly uncles. I am planting some of my drought resistant, easy to maintain and cheap Blue Daze, and transplanting the numerous red and white balsam plants so they can mingle with the blue of the Blue Daze to create a prettier garden, which has what MU calls the "Kampung style". Unfortunately the kampung style is not appreciated by the uncle living on the 5th floor at my apartment block (who has written many unpleasant odes about it to the *ahem*, the Town Council and even the Police *wtf right?*).

As for the other garden, it doesn't have that many insects and irritating snails. Just a lot of colorful personalities. That's why I refused several times to join the committee. There is no need to, when there are more knowledgeable persons who refuse to join the committee (Uncle Flower + Auntie Red, the former expert in all things floral, the latter all things edible), and plenty of noobs who are surprisingly more vocal than me and eager to show their leadership skills. I was telling Mdm Bear about it, and she said that these people are missing the whole point of the community garden. The visible bounds tether the garden tightly to the community center and its politics, so much that the politics are spilling over into the garden. Just reading through the list of names quoted for the garden, I could barely stifle a snigger. Obvious much?
I am not going to translate the names. Sorry about that.
So anyway the chairman (see what I mean?) said that the current land allocation was unfair as some people has more land than others. To me, these persons are coincidentally housewives and retirees who can manage their time more flexibly, so I have come to accept that they take more land (acceptance also came with my father's scolding me for being a dumbass. "You're not a bloody farmer so why fight with the old people over the land?" were his words). But the chairman himself doesn't have any land except for two miserable lemon grass plants, because earlier in the year, he was busy with his kids' study and home life without a helper, to stake his claim. We didn't even see him for months, until the holidays when he suddenly called for the meeting.

Unfortunately this new plan to reallocate plots will shorten the lifespan of the already growing plants in the garden. Everyone has to unearth their plants in February so that compost can be dumped onto the soil and everyone will begin again with their teammate on their plots, which we will draw lots for. I disagree with the Chairman's idea that the plots should be rotated, especially since he wants us to grow flowers and some of the flowers we prefer are perennial. His new idea of rotating plots is coupled to his initial plan of certain plots being allocated to growing certain plants, e.g. flowers, herbs. 

Since then, I experimented with two of my herb plants and they were very upset with the upheaval, dropping leaves like mad. And that was after I left them in the garden in the pots to reduce the transplant shock, and I did the transplant during the less painful monsoon December season instead of the more aggressive and hottest February, driest time of the year.

IMHO, it would be better if he does it the British allotment style where everyone is allowed to grow whatever they want as long as they grow flowers and vegetables on their plot, instead of forcing people to grow specific plants just because they were suay enough to draw the plot they didn't want.

From what little I have observed, I am pretty sure I will clash with the chairman if I were on the committee (his eagerness to accept my rejection of the role over the others' protests was very telling *lol*), and other than the American and maybe the Filipinos, I am the youngest gardener in that community garden. Would burn too much energy (not the right kind) to work my "charm" on the 20 other members in the garden.

I have enough fun @ Arbeit, without having to manage other people's personalities even when I am doing my favorite gardening. I try to incorporate the lessons お母さん is painstakingly inculcating in my interaction with others, but sometimes the snark just manifests itself. I can't help my inner bitch. Better to keep her leashed and my head down to the ground. Keep calm and garden.

Sunday, December 14, 2014

Time to replace the cupboard

The previous owner left behind a really ugly plywood shoe cupboard. Being cheapo, I moved it to the outside in the L-shape and utilized it as a potting bench cum shoe cupboard. 3 years on, it has been really hammered hard by the elements and the top layer is peeling badly from being soaked with water.

My requirements for a decent potting bench:
- at least 1 m long
- tall enough so that I won't break my back working on the plants
- must be covered so that the wind will not wipe my belongings and blow them all over the floor. The monsoon wind is wearing my long-suffering neighbors' patience thin.
- ugly enough to dissuade thieving hands but not so ugly that it grates on my aesthetic.

I have four choices. I could:
(1) utilize the S$39 (discounted) toilet cupboard I bought from IKEA. I had bought 2, but only set up 1 in the kitchen balcony for my other plants.
(2) utilize that cupboard in the kitchen for my other stuff, and move another ugly plastic cupboard that the previous owner left behind outside. It's too narrow to use as a bench.
(3) buy a S$19.90 shelf from IKEA. It has no doors, which I need, because the crazy ass wind will whip the things off
(4) Really HIDEOUS cupboard from Toyogo, It has shelves on top (I can put my roses on the shelf) and a cupboard underneath. It's not in stock *annoyed*
(5) Buy a S$79 cupboard from IKEA but it is too narrow and short.

You can understand why I need to buy really ugly stuff because pretty stuff get stolen from the outside of my apartment. So far we have lost a few pairs of shoes but our next door, Gardening-committee got it worse. Some horrible person stole 1 slipper and left the other behind. 

Or I could take apart the wooden shelf my mother built with me and reassemble it into a potting bench.

Monday, December 1, 2014

Decorative Indoor Gardening Ideas

Bark


Materials needed:
Aluminium, Bark, Empty bottle, hot glue gun

Steps:
1. Put the plant into the empty bottle.
2. Arrange the pieces of bark into appropriate heights, then apply hot glue to adhere the bark to the bottle.
3. Wind the aluminum around the bark.

Driftwood
Materials needed:
driftwood, sand, soil, ivory pebbles, seashells, wooden spoon, bamboo chopsticks

Steps:
1.  Put soil within the crevice of the driftwood.
2.  Plant varied sizes of succulents in the soil. Water the plants before covering with a coat of sand.
3.  Lay out the seashells and ivory pebbles on the driftwood. 

Soap Box

Materials needed:
soap box, sphagnum moss, string, scissors

Steps:
1. Retrieve the plant from its pot, and cut off excess roots.
2. Shape the root ball into a sphere with additional soil.
3. Cover the root ball with sphagnum moss.
4. Use the string to secure the moss sphere.
5. Place the sphere on the soap box.

Heart to Heart

Materials needed:
sphagnum moss, string, aluminum

Steps:
1. Wrap moss around soil, wind thread around the shape before forming it into a heart.
2. Form a gap within the heart to put in the seeds before winding more thread around the heart to secure the shape.
3. Poke the aluminum through the heart to tie both hearts together before shaping one end of the aluminum into a heart shape.

Air Plant Picture Frame

Materials needed:
2 wood pieces 20cm, 2 wood pieces 12cm, 2 lengths of twine 40cm each, driftwood, seashells, nails, hammer, hot glue gun,resin

Steps:
1. Form a picture frame by adhering white glue to the ends of the shorter wood pieces to the longer ends.
2. Nail the frame together to stabilize it.
3. Attach an appropriately sized driftwood to the frame with hot glue.
4. Wrap some twine around the frame in a decorative manner with hot glue.
5. Attach the air plant to the driftwood with hot glue.
6. Decorate the frame with seashells.


Wednesday, November 26, 2014

Barter trading - How I traded my way to a free Rose plant

I was walking to the nursery to buy soil for my intended radish growing experiment. As I was cutting through some blocks of flats, I noticed a man standing outside a first floor unit of one of the blocks. I was thinking whether to continue on or walk up to chat with him.

Since I am very KPO by nature, you can guess what I did. While chatting, he asked me what kind of plants I plant. I told him that I favor roses. He said, did you notice that I have a pot of roses? It was behind the support pillar. 

He said got it a year ago from the rubbish collection point, which was within LOS from his house (I wondered inwardly about his apartment's value). While I examining it, he unexpectedly offered it to me. He said he didn't like roses. Sacre Bleu!
I added the wigwam support, the wind that arrives with the December monsoon is no joke. My plants are going bald!
I was super delighted, especially since it was the color and variety that I had been trying to propagate (updated: ok since then I realized that the color is closer to that of the blackish red rose I have, not the electric pink one I have been trying to propagate). Attempted three times (once the CU even gave me a pot with balling roses, it died after my enthusiastic repotting in a bid to get rid of the balling problem), twice with no success. I had some cuttings root on my third attempt but I am not sure if they will succeed once I replant them in soil.
I asked him if he wanted anything in return (it's only polite right?). Unexpectedly he said cactus. Now I remembered that my mother and her friends excavated some neglected aloes and cacti from their allotment when they took over it and abandoned them in a sad corner of the allotment. So that was why I ended up taking a very long bus ride to her allotment to liberate one of the long-suffering prickly prisoners. They were very ungrateful and poked me along the way, renewing my hatred for cacti. I decided that it was quite ugly and broke off two ears and cleaned them before passing them to the man.

Wednesday, November 12, 2014

The Community Garden Downstairs

The community garden downstairs is pretty established. Several senior citizens have gardening at the plot long before I moved in, so there are many fruit trees there (e.g. sterile avocado tree, very fertile jambu trees). Right now the garden is manned by 1 Mr Malay uncle, 1 Mr Chinese uncle, and 1 Chinese Auntie, and now yours truly. Making an offering of Little Guy to the garden + sweeping up dead leaves in almost 3/4 of the garden for 3 hours were the key to my being offered a little plot too! Yes! No longer do I have to fight with those uncles and aunties at the other community garden for land, when I can have a garden here. Besides, this community garden has a much higher fence, so it is harder for bad people to liberate plants from it.

Or so I thought. Last Saturday, Mr Malay Uncle (let's call him MU for short) asked me if I had stopped by the garden two Sundays ago.

"No, I didn't. I hurt my back that day."

Upon further discussion, it transpired that some woman sneaked into the garden while CU was busy gardening, and cut up A LOT of pandan leaves without permission. But because CU didn't know she was inside, he locked up the garden when he left, effectively trapping the horrible woman inside.

Since she was trespassing, she couldn't call the police to release her, so she sat in the garden for almost an entire afternoon until CA came by to water the plants and saw her. Tsk tsk, talk about KARMA.

The very fertile jambu (water apple?) tree has been divesting fruit due to the monsoons recently.
Come on people, don't be cheap. If you must be cheap like me, be courteous about it.
MU's friend from National Parks Board gave him some sunflower seeds
So anyway I was given the tiny plot. MU suggested that I grow tomatoes, which is no problem for me, as I have had some success with them despite having to do pollination myself. But while the tomato seeds grow their true leaves in my little pots upstairs, I decided to grow some kangkong (water spinach) so as to not waste the land, which I tilled like mad for hours + dumped fertilizer + egg shells on, and to match the current monsoon season (as water spinach can tolerate excessive water very well).
3 days growth after sowing!
I moved some of the flowerpots so as to not hit them in my vigorous tilling, only to find some white stuff between the grooves. I thought that the white stuff was rice, but MU was right, they were ant eggs.

Less than two minutes (I timed them) after I lifted the pot, the ants came and carried all the eggs away to safety, one at a time. SUPER FAST. I admire and hate ants, for their efficiency. This same efficiency has allowed them to build nests in at least three of my more favored plants, the hibiscus cutting お母さん gave me, my big white rose and my black red rose (WTF), while I neglected my upstairs garden while busying myself with the community gardens.

お母さん says it is because I do not flood my plants with water, so the dry soil allowed the ants to make nests. Oh well... part of the problem that ants introduce is mealy bugs, which I enjoy squishing between my fat fingers.

Giant ass Toadstool

Now that I have increased my walking/ kick scootering (since last Saturday) as much as possible, I cut through a lot of apartment blocks on my way home between my old place and my new place during my stroll.

On Monday, Bobo and I decided to play hooky and take leave together to try out my new scooter at the park (kept raining so we ended up watching FURY at the cinema). But in the morning, before it started raining, we walked over to the prata restaurant near my old place. The prata was so-so, but the teh tarik was good. Unfortunately my tummy didn't agree, and began churning its displeasure.

So I waddled home as quickly as I could home, and on my way back cutting through the blocks, I came across these super giant toadstools (bigger than my palm!) growing at the bottom of a newly erected apartment block. WTF?

Been trying for days, but I still haven't googled what variety is this... anyone has a clue?

From this angle it looked like Mr Toadstool was puffing on a joss stick right?

Sunday, October 26, 2014

This little guy

In terms of propagating by stem cuttings, so far I only had success with this rose. The other roses' stems I cut all died within days, whether I use honey/hormone/nothing/soak in water. I had grown one in the new community garden.

And now I am giving this one  to the other community garden near my place. On a plus side, if anything goes wrong with my rose, I can always get it back next time. Yeah!

Monday, October 13, 2014

Layering success - Torenia

A couple of weeks ago, I attempted to layer my Torenia (bought at the Singapore Garden Festival) for my mother, after a failed attempt at stem cutting. 

What I did was to drag one of the soft stems downwards onto another pot of soil before burying the entire branch. I used a clip to hold down the branch while it remained attached to its mommy plant.
Two weeks later, I severed the branch from the mommy and tada!  A new Torenia.

Tuesday, September 30, 2014

Carting this guy home - hibiscus

This pot of hibiscus was from the cutting given by our late neighbor from next door. He was a bachelor who loved to grow flowers and look after injured pigeons and mynahs (seriously don't understand the fascination with those winged pests). It was quite sad really, he and his parents watched me and my brother grow up. First his dad died from a fall, then he died from cancer, and in the end, his mother had dementia and was taken away to live somewhere else. The apartment fell empty for 7 years until his remaining siblings were able to legally sell it and distribute the proceedings.  Till today, I consider them as our neighbors, and those people who lived in the apartment since, transient families. 

My parents have started reducing the plants in their garden and so my mom passed this guy to me because he had stopped flowering. I slowly carted him home on this trolley. I think he is suffering more because he can only get filtered morning sun now, poor thing, though he hasn't kicked the bucket under my care yet.

Sunday, September 28, 2014

Papaya tree

I think they call this pawpaw Down Under. There seems to be an uncle who is cultivating a secret garden at the two patches of land near my old place. He has awesome luck with papayas especially. Check out the fruit on the tree!

Saturday, September 27, 2014

[Singapore Garden Festival 2014] Propagating Torenia

I was looking closely at the torenia that I bought at the Singapore Garden Festival. The stems that touch the soil have developed roots, so I was convinced that it would be easy to propagate them by the stems. Mutter loves the flower, but the cuttings she took from her garten never survive and she really likes purple color. The torenia she got from the garten is pink anyway.

So I did a stem cutting and soak it inside some water. But it didn't work, possibly because the stupid wind in the corridor blew the stem onto the floor *roll eyes*. So now I am attempting layering, which is to bury some extensive stems into the soil while they still take in nutrients from the main plant. Kind of like a umbilical cord :D

Wish me luck!!!


Friday, September 26, 2014

Sealing the Kitchen Sink

The silicon around the kitchen sink looked extremely gross, until a point that our food was coming with a sprinkling of bacteria and a dashing of mold. It was replaced by Bobo about 1-2 years ago, after the contractor gave such a thin silicon layer that while aesthetically pleasing, was useless.

In the summer dearth of American tv, and no longer having cable, I ended up watching anything and everything I could find online. One of which was the Home and Gardens show where this Aussie guy was teaching how to replace silicon caulking along the kitchen wall. He made it look really easy.

I also asked Dad how to do it, hoping that he would say "I will do it for you." Nope, he expected Bobo to do it. He threw shade at me attempting it, but advised that I should use white cement as it doesn't grow mold or bacteria as much. 

I bought the cement (powder?), and methanol (for wiping down the bacteria, and making the sink area dry) from the hardware shop. I asked the lady boss how to mix the cement, she said mix to your own consistency. WTF #1. 

So I went home, thought about it since I was only going to replace the silicon on the next weekend (I would be going to my cousin Man Utd's baby's 1st birthday celebration, which gives me ample time to dry the cement). What if the sink spoils and I need to replace it? Will I be able to remove CEMENT?

In the end, before I went to the birthday celebration, I went to the same hardware shop again, to buy a tube of silicon. The Uncle boss is another one, he asked me whether I needed more than 1 tube. WTF #2. Did he think I was going to caulk an entire toilet? Then he asked me if I needed anything else. I mulled a little, then said no, I don't think so. 
stuff i need for caulking
So armed with the following items, I attempted to replace the caulking. According to Mr Buff man, I needed  (in the following order): a scraper, alcohol (to wipe down residue dirt/germs/mold/bacteria and to make the sink bone dry),  detergent water in a spray bottle, masking tape and my middle finger. Ah yes, I need silicon.

Steps according to him:
(1) Scrape off the caulking with a scraper
(2) Wipe down the area with alcohol
(3) Place a strip of masking tape to gap the sink and keep the silicon in a constant bead. 
(4) Spray the detergent water, then run finger down the bead to press it down smoothly.
(5) Remove the tape.

I used my artist palette knife (no point spending money to buy a scraper right?) to dig at the caulking. After struggling for like 5 min, and with 1 hour to go before the birthday party, I decided to google on my phone.

Noob error # 1 - I need a hair dryer.

Hair dryer melts the silicon very well. Just apply the heat for 30-40s near the silicon and then scrape. Took me about 1 hour (I was late for the party).
applying hair dryer
Wiping the area down with alcohol was easy, but the next step was a killer. I  asked the uncle boss how to use the silicon. His words were: remove the cap, and squeeze out of the funnel. Guess what. When I tried that, I squeezed until I was going to blow up, nothing came out of the funnel. In the end, pop went the back of the tube. It was then I realized I was supposed to push the back inwards to squeeze the silicon from the front. 

Noob error #2 - I need a silicon gun. 

Well, Not everyone is as fit as that buff man. I nearly died trying to push the silicon along the tube, because my fingers are too stubby and short to push it past the middle of the tube. And struggling to push it out, I couldn't maintain a constant bead and the silicon came out in fits and farts. While I was struggling, it was drying.

In the end, I gave up, chucked out the funnel and applied the silicon on with my fingers, as if painting. Sigh.

Noob error #3 - Remove the tape immediately.
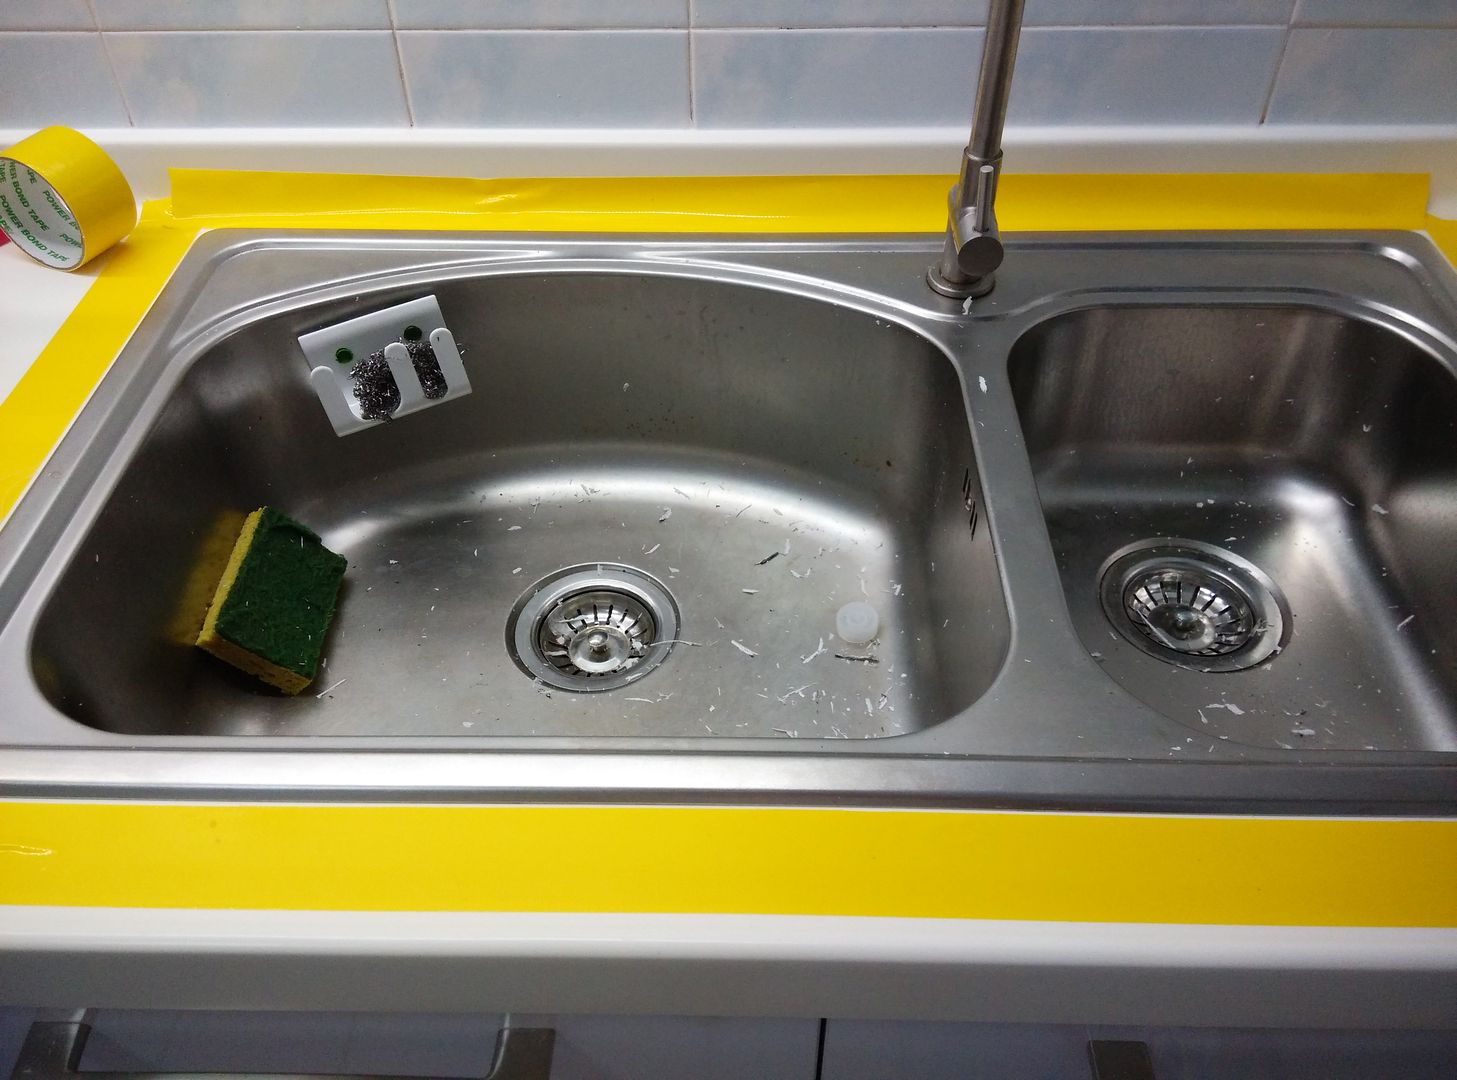
tape around sink. remember to remove immediately after applying silicon!
I ran my finger down the line, pushing whatever that went over onto the sink back down onto the gap for a constant seam. Since I applied the silicon free hand, I forgot I should remove the masking tape immediately and push with my fingers again. Instead I only realized the next morning (many hours later) that the silicon has solidified over the tape, making an irregular flap along the sink.

*silent scream*

Had to cut away the excess, and reapply another bit to make sure that the seam is perfectly adhered to the table top, and not flapping away.

Wednesday, September 24, 2014

My Office Rose (repotted and regrowth)

This is one of the 2 roses that Mr Bear helped me buy from the Cheers near his house. The particular rose has a gorgeous color that persists for a very long time. The effects of growing roses in the office versus growing them at home (in L shape / kitchen balcony) is astronomically different.
Had to carry them out with Mr Bear walking in front to prevent being crushed by the evening crowd
Since the office environment is always air-conditioned (except for weekends and late nights), the plants flourish very well, as if in a temperate country. At the beginning, I keep 4 pots of them in office as the "mummy plants" because the roses at home (kitchen balcony) were dying like mad. I also wanted to experiment on the various ways to transplant and propogate them. Eventually I figured out that it was the effect of no ventilation + heat, which killed most of them. So I moved the home roses to the L-shape. Till date, thank god, nobody stole them yet, but the rose blooms do not proliferate as many as those in the office. The best I got from office was 11 blooms at one single time (peach rose) versus 4 at home (pink baby).
I am ready for my close-up
However both pots came in very small pots after a while so the bush was very small and you could see that the roots coming out. So during a blooming lull, I transplanted this bush into a bigger pot. It went into shock despite my efforts and dropped A LOT of leaves. I thought it was doomed, but dumped in loads of goat poopoo, and bonemeal in a vain hope of rescuing them. In the end it was egg shell and egg shell water that saved it. But now I learnt that epsom salt was probably what was missing.

I was rewarded with rebloom and new leaves. phew. The awesome part of repotting is the new bush is bigger, and I get more flowers. But it was pretty stressful for a while.

Monday, September 22, 2014

Mutters Garden Sep 2014

I wanted to get mushrooms (the hydroponic farm near Mutter's garden also has a distribution and packaging arm), so when I heard that Mutter's friends were going to their allotment that Saturday, I immediately asked to hitch a ride there. The mushrooms are totally worth the trip, they cost like 30+ mushrooms for S$10, versus if you were to buy from the supermarket, you'd get about 8 for S$3.95. And I wanted to check out if the nursery was selling roses. I wanted to add more colors to my collection, now that I wasn't killing them out of inexperience (stupidity is another story).
Did I mention the kind hearted retiree uncles helped the ladies redo the entire garden layout?
After buying three pots of roses (the purple one was already not doing well, its lower leaves were turning yellow, but I never had purple roses before, so...), I walked back to the allotment and took some pics of the garden. The ladies were packing up some cuttings to bring to the new community garden. Saga on that later.
The solitary papaya.
Me yanking out the papaya tree
Lady C, our downstairs auntie, said that she wanted the papaya tree removed from "her" plot. So after harvesting the sole papaya from the tree, we yanked out the long suffering tree, and carried it to the end of the allotment, where it would dry up and become... I have no idea. Anyway it turned out later that it was Mutter who brought the papaya home. We ate it and it was wonderfully scrumptiously sweet. DELISH~! Quite a miracle, considering the women's sporadic watering (almost zilch, they depend on the water sprinkling system + weekly waterings, which meant their vegetables appear weed-like).

While chucking out the papaya tree, I caught sight of a slight movement among the "weeds". Crouching down, I saw this little guy. Uncle Toad!

Wednesday, September 3, 2014

Stupid mynah strikes again

That NBCB bird is at it again!
Destroying the delicate leaves on my poor rose cutting. No wonder there were no new leaves! 

<u>Updated!!!</u>
So I brought it to the community garden and planted it there. After <2 weeks, I am pleased to say, there is a bud forming. It is recovering nicely. Nothing like >6 hours of sunlight per day. Good thing it is going to bloom soon, because I have no idea which rose did I cut this from... I am waiting with bated breath to check it out.
See the bud growing nicely in the middle of the three sets of leaves.

Sunday, August 31, 2014

Pink Guava (Jambu) Farm in Batam, Indonesia

We just had a short weekend break in Batam, Indonesia. Our stay, Harris Resort Waterfront, is far from the action, and a one-way taxi fare from here to Nagoya/ Harbor Bay (seafood) is 130K rupiah (~S$14). Expensive!

But there is an option to travel using the bus (S$5 one way/person to only Nagoya Mall). The first day, we took the bus and on the way back, Bobo and I noticed that there was a farm AND a fishing pond near our resort. Bobo was more into the fishing pond, and me, the farm.
Guava Farm
So when we got back to the resort, we dumped our stuff and started walking towards the farm. It was more than 1 km away. I bought 6 of them (around 1 kg) for 20K rupiah. Only got to eat them after carting them home because I didn't have a knife, let alone a vegetable peeler. When I cut them open, I discovered that they were PINK GUAVA. OMG. Shoot, now I wish I bought more.

They tasted fantastic and sweet, FYI.
Pink Guava

Tuesday, August 26, 2014

[Singapore Garden Festival 2014] Roses seen and admired + tips I have learnt so far about keeping them alive in Singapore [USDA zone 11b]

The stalls might be selling predominantly orchids. But I have only eyes for roses...
(1) Roses love to drink coffee. Just kidding. Feed them coffee grounds for these beautiful suckers love acidic soil. Dry the coffee grounds first before putting them on the soil. I'd cover with a layer of soil, then pour some water to release some needed nitrogen into the soil. Btw tomatoes love coffee too.

(2) Roses also like egg shells. The usual approach would be to bake the shells then grind them before feeding them to the plants. Baking is for preventing salmonella. But what I do so now is to boil the egg shells. Same function, and I feed the egg-shell-boiled water to the plants as well. I don't grind the egg shells though. I prefer to pound them with something hard to shatter them into little bits. Get a little workout!

(3) I drink pu-er tea nowadays. I don't throw away the leftover dregs. I feed them to my roses. Don't put them near the stem though.
(4) Cloching stem cuttings with plastic bottles do very well for roses. Much better than soaking them in water, which takes forever!!! I soaked one cutting for months, never getting anything. Instead, once I did the cloching method, I got roots like in 2 weeks!

(5) So about the cloching method. I had read that we should use stem cuttings that are about pencil thickness. But I have used thinner ones and succeeded. What you do is that if you have the thick stems, you cut a cross on the bottom of the stem. Then either dip that end in rooting hormone/honey/nothing (which is what I did), before planting it in moist soil. Put a plastic bottle (which you have cut the bottom off) over it, creating a little greenhouse, and let it grow roots. Only release the bottle once a week for oxygen, otherwise leave it alone. After a couple of weeks, tug at the stem gently. If there is resistance, then the rose has rooted.
(6) For stem cuttings that use soaking method, I think that cutting new shoots is the best way to go. You might have to sacrifice the potential of new blooms this way, but I have found that cutting new shoots and soaking them is pretty effective. Only about 2-3 weeks before roots will appear.

(7) Add a little Epsom salt (magnesium sulphate) to water before watering your roses. For blooming roses, give about 1 tbsp to 500ml (that's what I am doing now). This will prevent your rose leaves from turning yellow along the veins.
Related Posts Plugin for WordPress, Blogger...

Because Gardening makes me wanna Dance! Thanx for visiting!!!

Because Gardening makes me wanna Dance! Thanx for visiting!!!